
A 4 way switch is the intermediate device in a three-or-more location lighting circuit that lets any switch in the chain change the light. This article defines the device, explains how it reroutes traveler conductors, lists the parts and tools required, gives a clear five-step wiring sequence for a standard three-location arrangement, and covers dimmer options and common troubleshooting steps for real projects.
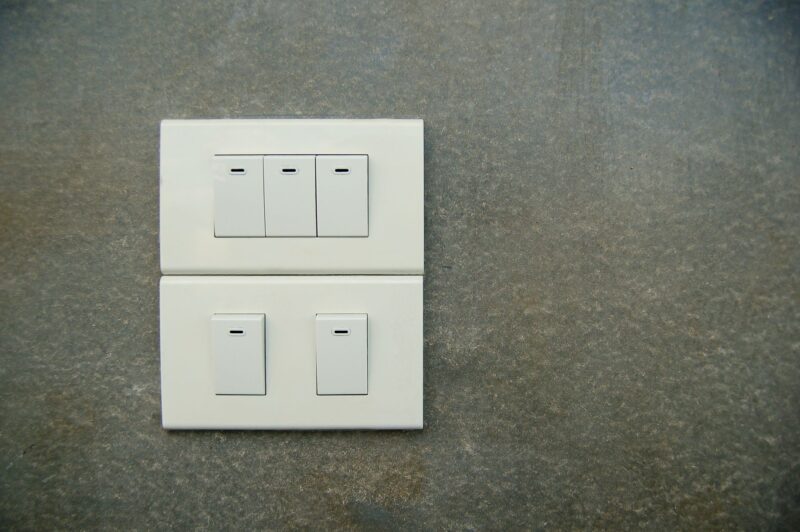
Practical Definition
In practice, a 4 way switch has four terminals arranged as two traveler pairs, and it only swaps or passes those traveler conductors; it never receives the incoming line feed or carries the switched load to the fixture. That behavior means the 4 way cannot be treated like a 3-way common. If the travelers are misidentified at either 3-way end, the multi-location control fails.
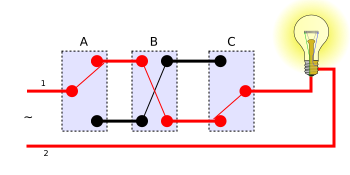
How a 4 Way Switch Works
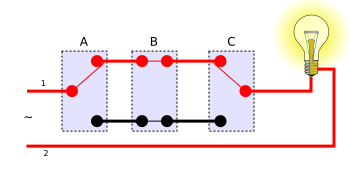
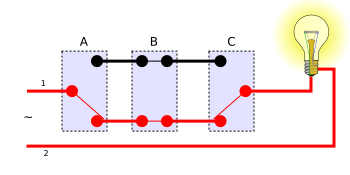
Two 3-way switches form the ends of the circuit and create the feed-to-load path when their commons align through the traveler pair. The 4 way sits between them and either connects each traveler to its like partner or crosses the pair. That crossing changes whether the downstream 3-way completes the circuit, so flipping any switch in the chain toggles the light.
For an animated, frame-by-frame view of how the travelers are passed or crossed, consult the 4-way switch wiring and behavior, interactive animation. Use the animation to match the device's internal positions to the traveler wires you see in the box.
Tools and Parts Needed
Buy a switch rated for at least the circuit amperage and gather hand tools before you open any box. Typical items:
- Standard 4 way toggle or Decora-style switch rated for 15 A or 20 A according to the circuit.
- 3-conductor cable with ground (often labeled 14/3 or 12/3 depending on circuit) for traveler runs; re-identify any repurposed white conductor per local code.
- Screwdrivers, a wire stripper, needle-nose pliers, non-contact voltage tester, and a multimeter or continuity tester for verification.
- Wire nuts, electrical tape, and mounting screws. Replacement 4-way switches and traveler accessories are available via Amazon: 4-way light switch products.
For a primer on switch wiring concepts and terminal identification, see the Switches tutorial (electrical wiring), which covers how 4-way switches fit into the multi-switch topology and clarifies the distinction between commons and travelers.
Five-Step Wiring Guide
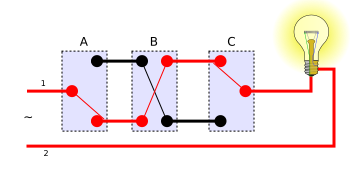
This sequence assumes power enters the first 3-way, travelers run through the 4 way, and the second 3-way feeds the fixture. Always de-energize the circuit at the breaker and verify power is off at the device before you begin.
- Step 1. Identify and label. Label the line, load, and the two travelers at each box before disconnecting anything. If the feed is in the middle box, note that clearly because the wiring sequence changes.
- Step 2. Run continuous travelers. Use continuous 3-conductor cable between adjacent boxes so the traveler pair is uninterrupted. Continuous travelers preserve the predictable mapping the 4 way expects.
- Step 3. Connect travelers to the 4 way. Attach the two traveler conductors from the upstream 3-way to one paired set of 4-way terminals, and the pair to the downstream 3-way on the other. Follow the device label; some manufacturers color-code the terminal pairs.
- Step 4. Secure grounds and neutrals. Bond all grounds together and to each device. Keep neutrals continuous in the cable bundle and do not route neutral through the 4 way unless the device documentation explicitly requires a neutral connection.
- Step 5. Test the full sequence. Restore power and cycle every switch in the circuit. The light must change state when any switch flips. If it does not, de-energize and re-check traveler continuity and the common connections at the 3-way ends.
Quick Reference Table
| Item | Quick Fact | Practical Note |
|---|---|---|
| Function | Intermediate switch for multi-location control | Only swaps traveler pairs. No common terminal used for line or load. |
| Terminals | Four terminals (two traveler pairs) | Terminal pairing varies by model; verify with the device diagram. |
| Devices | Standard 4-way, 4-way dimmer, or auxiliary add-on | Follow manufacturer diagrams for dimmers and smart add-ons to ensure compatibility with LED loads. |
Dimmers, Add-Ons, and Smart Alternatives
Traditional 4-way dimmers exist, but a common modern approach uses a master dimmer at one end plus compatible auxiliary remotes. That lets the master handle the load while remotes send control signals over travelers or wirelessly.
- When using dimmers, only specific combinations work together. Install compatible master and 3-way/4-way components from the same product family and follow the wiring diagram supplied by the manufacturer.
- Wireless auxiliary remotes remove the need for extra travelers in some retrofits, but confirm the wireless system supports the lamp type and dimming method used in the circuit.
Common Mistakes and Troubleshooting
Use this sequence to isolate common failures:
- Confused common versus traveler. Verify the common at each 3-way; one common is line, the other is the switched hot to the fixture.
- Open traveler. Use a continuity tester to check each traveler pair between boxes; even a single broken conductor defeats the multi-location circuit.
- Poor terminal contact. Re-seat wires under screw terminals, trim damaged conductor ends, and torque screws snugly to ensure reliable contact.
- Incompatible dimmer or smart component. If the dimmer causes flicker or erratic behavior, compare the device documentation to the lamp load and wiring method; many LED-compatible dimmers require a neutral or specific traveler signaling scheme.
Safety and Final Inspection Checklist
Before closing boxes and restoring normal use, confirm each item below:
- Neutrals remain continuous and are not used as travelers unless re-identified and allowed by code.
- All grounds are connected and device grounds are tightened.
- Screw torque approximates the manufacturer specification; screws are snug but not over-torqued.
- Full switch sequence verified with the power restored: exercise every switch in every position to confirm correct operation.
- Any buzzing, heat, or persistent flicker triggers immediate de-energizing and re-checking of dimmer compatibility and wiring.
Related Technical Reading on This Site
For wiring context that supports multi-location circuits, see the site guide explaining when 14/3 cable is required for applications such as 3-way and traveler runs at what is the difference between 14-2 and 14-3 wire types. That article clarifies why a third conductor is needed when you must carry two travelers plus a neutral or ground.
For practical lighting controls and product selection in home projects, the site’s Best HomeKit Light Switch review evaluates smart switch form factors and wiring implications that matter when a smart master replaces a traditional 3-way or 4-way arrangement.
Ideas for wiring-aware lighting layouts and under-cabinet or room lighting techniques appear in the site’s general lighting guide at DIY home lighting ideas, which helps correlate fixture placement, switch grouping, and circuit planning before you run travelers between boxes.
Where to Read More
For step-by-step diagrams and a university-level tutorial explaining switch types and terminal roles, consult the animated explanation and the Switches tutorial:
- 4-way switch wiring and behavior, interactive animation for visualizing traveler swaps.
- Switches tutorial (electrical wiring) for terminal definitions and wiring principles that apply to 3-way and 4-way circuits.
Our Product Pick
Greencycle 3 Way Light Switch,Three Way Single Pole Switches is one option to look at if you want a ready-made tool for this job. As an Amazon Associate we earn from qualifying purchases.
Related Video
A 4-way switch is a useful component in multi-switch lighting setups. It allows control of a single light fixture from three or more locations, enhancing flexibility in home lighting design. Understanding how these switches function can simplify installation and offer more control over your environment.
More from Architecture Adrenaline
For more posts like this, check out our social channels for updates and insights. Follow us on Instagram for design ideas and tips on architectural projects.